 |
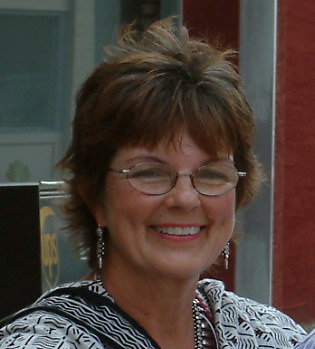
| Robert #2 • 7-1/2 x 7-1/2" • Oil on 8-ply Museum Board |
The Robert photos were taken with a Motorola Xybord tablet. I deleted my discussion of how this photo differs from the actual painting.
 |
| Here's Robert 1 again, for comparison. Quite a style change! |
• 2 colors: Utrech Raw Sienna & Holbein Compose Blue
Utrecht Titanium white & possibly a Gamblin grey
• Surface: acrylic primed 8-ply Museum Board
• Tool: Loew-Cornell J-2 palette knife
I didn't want anything to get in the way of
my improvisation.
my improvisation.
Approach to Robert 1: more traditional - start with tone and line - move on to masses - refine each mass as the painting progresses. Goal: a quality of light and form.
Approach to Robert 2: careful observation of shapes and values - paint applied in a lively and interesting way - Goal: explore how far I could push two colors and white, make a poetic statement with an interesting painting surface.
Approach to Robert 2: careful observation of shapes and values - paint applied in a lively and interesting way - Goal: explore how far I could push two colors and white, make a poetic statement with an interesting painting surface.
Problems: The 2 colors were chosen quickly, just minutes before I left my studio. I thought 'temperature' but didn't consider value. At some point in the painting process, the light bulb went on, and I said to myself, "These two colors have limited your ability to get a dark dark." Remember, color has value! I was frustrated at the very end of the painting without a slightly darker accent. I will reveal the secret of the darkest darks later.
Compose blue is a color I purchased from Carl Dalio's workshop supply list. It suffices as a poor man's Cerulean blue, with a rather weak tinting strength. Mix it with Raw Sienna , and you do get a greenish blue - sort of an aqua, but not quite.
I pre-mixed these two colors full strength in varying ratios to see how they affected each other. I decided go with the coolest result for the overall shadow area of the head. No tone this time, I had no OMS with me. No placement lines or outlines this time, I was using only my palette knife. I had to use my mind's eye, drawing skills, and experience for the placement. I believe I started in what would be the cheek area, and worked outward by applying a thin layer of paint that continued to grow into a shape that resembled Robert's head.
On the model's break, I mixed more nuances of tones and value, pushing the notes toward blue or the green, or sienna, adding white, working for as much variety as I could get from these two particular colors and white.
What's in a surface? By now you know that I love a varied surface almost more than life itself! You can see that I scratched through the translucent paint surface, and then smoothed some of lines back out. I worked and reworked until I got the look I wanted. And of course, the thinner layers are contrasted with some passages of thicker paint. Variety, the spice of life, and for me, the life of a painting.
The value of overpainting an area: If you overpaint a shape slightly, don't panic, you now have the wonderful opportunity to correct your shapes by painting negatively. You can get some wonderful effects and interesting edges with negative painting. Sometimes will might pull some of the positive colors the negative area. Don't panic, this can work for you. Let it live there a while while you ponder it as part of the whole. Experience in painting will tell you if this is a good thing for that painting. I know that Kevin Macphersen had this happen in a demo and told his audience, "Leave it!" Sometimes a 'preceived mistake' is a blessing in disguise, but it takes experience to sort this out.
You must be willing to take a risk if you are to move forward in your work.
I pre-mixed these two colors full strength in varying ratios to see how they affected each other. I decided go with the coolest result for the overall shadow area of the head. No tone this time, I had no OMS with me. No placement lines or outlines this time, I was using only my palette knife. I had to use my mind's eye, drawing skills, and experience for the placement. I believe I started in what would be the cheek area, and worked outward by applying a thin layer of paint that continued to grow into a shape that resembled Robert's head.
It was rather exciting to see how easy this was!
And fun. Fun is important, so I've been told.
And fun. Fun is important, so I've been told.
 |
| I know that I've been reading a lot of history lately, and studying French, but I can just see this guy as someone that could have gone to the guillotine. Must be the regal nose! |
What's in a surface? By now you know that I love a varied surface almost more than life itself! You can see that I scratched through the translucent paint surface, and then smoothed some of lines back out. I worked and reworked until I got the look I wanted. And of course, the thinner layers are contrasted with some passages of thicker paint. Variety, the spice of life, and for me, the life of a painting.
The value of overpainting an area: If you overpaint a shape slightly, don't panic, you now have the wonderful opportunity to correct your shapes by painting negatively. You can get some wonderful effects and interesting edges with negative painting. Sometimes will might pull some of the positive colors the negative area. Don't panic, this can work for you. Let it live there a while while you ponder it as part of the whole. Experience in painting will tell you if this is a good thing for that painting. I know that Kevin Macphersen had this happen in a demo and told his audience, "Leave it!" Sometimes a 'preceived mistake' is a blessing in disguise, but it takes experience to sort this out.
You must be willing to take a risk if you are to move forward in your work.
"After all," says Ken Auster,
"What are you afraid of, one more bad painting?"
"What are you afraid of, one more bad painting?"
 |
| I love a surface with paint from transparent to opaque, thin to thick. |
Challenge: getting the above the ear the right tone and value. In the photo the hair appears dark and brown, but in the painting it's really a softer warm gray. Risk: If I apply the wrong tone mixed with white, I will never be able to get back my transparent or translucent surface and have it look the same. Fun: Along the edge of his nose I used some pure raw sienna near the highlight, as that actually appeared red to me on the model.
I was not happy with the chest, however, the light on the chest had many subtle twists and turns, and I was using my magnetic easel which pulls on the metal of the palette knife. But no matter, I love this little effort because it is more about the process of painting a poetic statement. There is more of a sense of light in the painting than in the photos, and to my eye, there is more poetry here.
Hint: Need a dark? Visit your neighbor's palette while they're on break and dip into the thalo green, no less. Lucky for me, that green was almost dry, and I had to work hard just to get even a smidge. Still, it doesn't take much to get the value shift that I wanted for a very few dark darks in the eye socket. And of course, it does help if you know your neighbor.


No comments:
Post a Comment